
Webhooks
Webhooks (also known as web callbacks) are a simple method that allows an application or system to provide real-time information whenever an event occurs. It's a passive way of receiving data between two systems via an HTTP POST request.
Webhooks notifications can be configured for each application created in Your integrations. You can also configure a test URL that, along with your test credentials, allows you to test the correct operation of your notifications before going live.
Once configured, the Webhook will be sent whenever one or more registered events occur, eliminating the need for constant checks and thus preventing system overload and data loss in critical situations.
To configure your Webhooks notifications, choose one of the options below:
| Configuration type | Description |
| Configuration through Your integrations | Allows configuring notifications for each one of your applications, identifying different accounts if necessary, and validating the notification origin using the secret signature (except notifications for QR Code integrations). |
| Configuration during payment creation | Allows specific configuration of notifications for each payment, preference or order This configuration is not allowed for Mercado Pago Point. |
Once notifications are configured, refer to the necessary actions after receiving a notification to validate that the notifications were properly received.
Configuration through Your integrations
Set up notifications for each application directly in Your integrations efficiently and securely. In this documentation, we will explain how:
- Specify URLs and configure events
- Validate the notification source
- Simulate receiving the notification
1. Specify URLs and configure events
To configure Webhooks notifications via Your integrations, it is necessary to specify the URLs where they will be received and the events for which you wish to receive notifications.
To do this, follow these steps:
- Access Your integrations and select the application for which you want to enable notifications. If you haven't created an application yet, access the Developer Dashboard documentation and follow the instructions to do so.
- In the left menu, click on Webhooks > Configure notifications and configure the URLs that will be used to receive notifications. We recommend using different URLs for testing mode and production mode:
- Test mode URL: provide a URL that allows testing the correct operation of notifications for this application during the testing or development phase. Testing these notifications should be done exclusively with the test credentials of productive users.
- Production mode URL: provide a URL to receive notifications with your productive integration. These notifications should be configured with productive credentials.
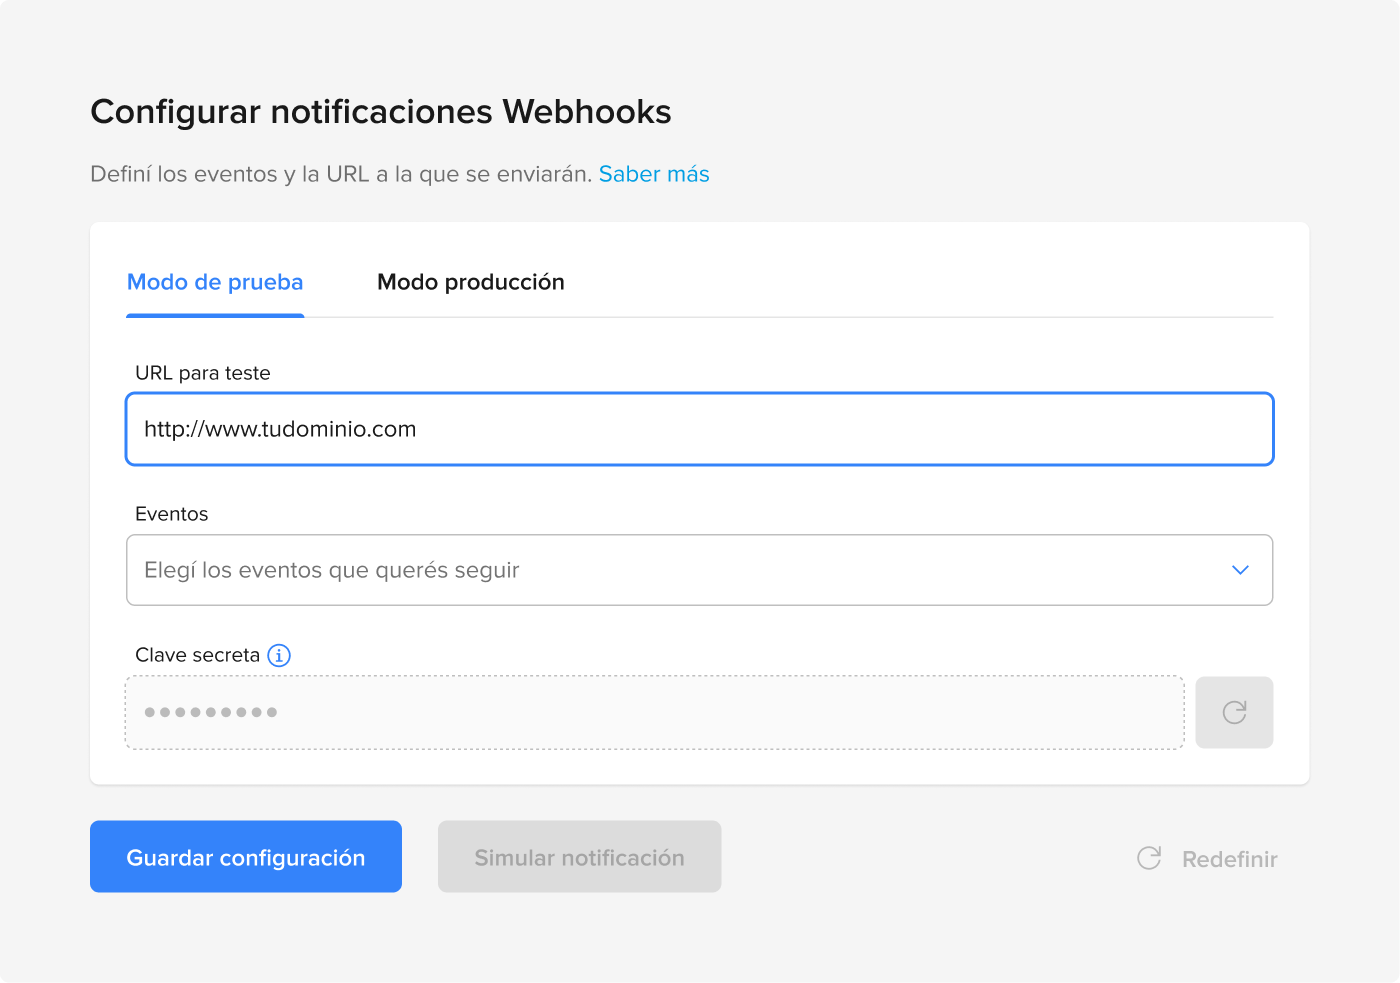
- Select the events from which you want to receive notifications in
JSONformat via anHTTP POSTto the URL specified earlier. An event can be any type of update on the reported object, including status changes or attributes. Refer to the table below to see the events that can be configured, considering the integrated Mercado Pago solution and its business specifics.
| Events | Name in Your Integrations | Topic | Associated products |
| Creation and update of payments | Order (Mercado Pago) | orders | Checkout Transparente Mercado Pago Point QR Code |
| Creation and update of payments | Payments | payment | Checkout Transparente (legacy) Checkout Pro Checkout Bricks Subscriptions Wallet Connect |
| Recurring payment of a subscription (creation - update) | Plans and Subscriptions | subscription_authorized_payment | Subscriptions |
| Subscription linking (creation - update) | Plans and Subscriptions | subscription_preapproval | Subscriptions |
| Subscription plan linking (creation - update) | Plans and Subscriptions | subscription_preapproval_plan | Subscriptions |
| Linking and unlinking of accounts connected via OAuth | Application linking | mp-connect | All products that have implemented OAuth |
| Wallet Connect transactions | Wallet Connect | wallet_connect | Wallet Connect |
| Fraud alerts after order processing | Fraud alerts | stop_delivery_op_wh | Checkout Transparente Checkout Pro |
| Creation of refunds and claims | Claims | topic_claims_integration_wh | Checkout Transparente Checkout Pro Checkout Bricks Subscriptions Mercado Pago Point QR Code Wallet Connect |
| Retrieval of card information and update within Mercado Pago | Card Updater | topic_card_id_wh | Checkout Pro Checkout Transparente Checkout Bricks |
| Creation, closure, or expiration of commercial orders | Commercial orders | topic_merchant_order_wh | Checkout Pro QR Code (legacy) |
| Opening of chargebacks, status changes, and modifications related to the release of funds | Chargebacks | topic_chargebacks_wh | Checkout Pro Checkout Transparente Checkout Bricks |
| Completion and cancellation of payment attempt, or error processing payment attempt from Mercado Pago Point devices. | Point Integrations | point_integration_wh | Mercado Pago Point (legacy) |
- Finally, click on Save. This will generate a unique secret signature for your application, allowing you to validate the authenticity of received notifications, ensuring they were sent by Mercado Pago. Note that the generated signature does not have an expiration date, and its periodic renewal is not mandatory but highly recommended. Simply click the Reset button next to the signature to renew it.
2. Validate notification origin
Notifications sent by Mercado Pago will be similar to the following example for a payment topic alert:
json
{ "id": 12345, "live_mode": true, "type": "payment", "date_created": "2015-03-25T10:04:58.396-04:00", "user_id": 44444, "api_version": "v1", "action": "payment.created", "data": { "id": "999999999" } }
Mercado Pago will always include the secret signature in the Webhooks notifications received at the registered URL, which will allow you to validate their authenticity to provide greater security and prevent potential fraud.
This signature will be sent in the x-signature header, as shown in the example below.
x-signature
`ts=1704908010,v1=618c85345248dd820d5fd456117c2ab2ef8eda45a0282ff693eac24131a5e839`
To confirm the validation, it is necessary to extract the key from the header and compare it with the key provided for your application in Your integrations.
Follow one of the approaches below to validate the authenticity of the notification.
The official SDK implements HMAC-based Webhook Signature Verification to authenticate the origin of each received notification.
To get your secret key (secret), select the application in Your integrations, click Webhooks > Configure notification, and reveal the generated key.
<?php
use MercadoPago\Webhook\WebhookSignatureValidator;
use MercadoPago\Exceptions\InvalidWebhookSignatureException;

try {
    WebhookSignatureValidator::validate(
        $_SERVER['HTTP_X_SIGNATURE'],
        $_SERVER['HTTP_X_REQUEST_ID'],
        $_GET['data_id'],
        $secret
    );
    http_response_code(200);
} catch (InvalidWebhookSignatureException $e) {
    http_response_code(401);
}import { WebhookSignatureValidator, InvalidWebhookSignatureError } from 'mercadopago';
try {
WebhookSignatureValidator.validate({
xSignature: req.headers['x-signature'],
xRequestId: req.headers['x-request-id'],
dataId: req.query['data.id'],
secret,
});
res.sendStatus(200);
} catch (err) {
if (err instanceof InvalidWebhookSignatureError) res.status(401).end();
else throw err;
}from mercadopago.webhook import WebhookSignatureValidator, InvalidWebhookSignatureError
try:
WebhookSignatureValidator.validate(
request.headers.get("x-signature"),
request.headers.get("x-request-id"),
request.args.get("data.id"),
secret,
)
return "", 200
except InvalidWebhookSignatureError:
return "", 401import "github.com/mercadopago/sdk-go/pkg/webhook"
err := webhook.ValidateSignature(
r.Header.Get("x-signature"),
r.Header.Get("x-request-id"),
r.URL.Query().Get("data.id"),
secret,
)
if err != nil {
w.WriteHeader(http.StatusUnauthorized)
return
}
w.WriteHeader(http.StatusOK)using MercadoPago.Error;
using MercadoPago.Webhook;
try {
WebhookSignatureValidator.Validate(
xSignature: Request.Headers["x-signature"],
xRequestId: Request.Headers["x-request-id"],
dataId: Request.Query["data.id"],
secret: secret);
return Ok();
} catch (InvalidWebhookSignatureException) {
return Unauthorized();
}import com.mercadopago.webhook.WebhookSignatureValidator;
import com.mercadopago.exceptions.MPInvalidWebhookSignatureException;
try {
WebhookSignatureValidator.validate(
request.getHeader("x-signature"),
request.getHeader("x-request-id"),
request.getParameter("data.id"),
secret);
response.setStatus(200);
} catch (MPInvalidWebhookSignatureException e) {
response.setStatus(401);
}require 'mercadopago/webhook/validator'
begin
Mercadopago::Webhook::Validator.validate(
request.headers['x-signature'],
request.headers['x-request-id'],
request.params['data.id'],
secret
)
head :ok
rescue Mercadopago::Webhook::InvalidWebhookSignatureError
head :unauthorized
endNecessary actions after receiving a notification
When you receive a notification on your platform, Mercado Pago expects a response to validate that you received it correctly. To do this, you need to return an HTTP STATUS 200 (OK) or 201 (CREATED) status.
The waiting time for confirmation of receipt of notifications is 22 seconds. If this confirmation is not sent, the system will understand that the notification was not received and will retry sending every 15 minutes until a response is received. After the third attempt, the interval will be extended, but the attempts will continue.
After responding to the notification and confirming its receipt, you can obtain the complete information of the notified resource by making a request to the corresponding API endpoint. To identify which endpoint to use, check the table below:
| Topic | URL | Documentation |
| order | https://api.mercadopago.com/v1/orders/{id} | Get order by ID (for Checkout Transparente) |
| order | https://api.mercadopago.com/v1/orders/{order_id} | Get order by ID (for Mercado Pago Point) |
| order | https://api.mercadopago.com/v1/orders/{order_id} | Get order by ID (for QR Code) |
| payment | https://api.mercadopago.com/v1/payments/[ID] | Get payment for Checkout Transparente, Checkout Pro or Subscriptions |
| subscription_preapproval | https://api.mercadopago.com/preapproval/search | Search subscriptions |
| subscription_preapproval_plan | https://api.mercadopago.com/preapproval_plan/search | Search subscription plans |
| subscription_authorized_payment | https://api.mercadopago.com/authorized_payments/[ID] | Get invoice data |
| topic_claims_integration_wh | https://api.mercadopago.com/post-purchase/v1/claims/[claim_id] | Get claim details |
| topic_merchant_order_wh | https://api.mercadopago.com/merchant_orders/[ID] | Get merchant order for Checkout Pro or for QR Code (deprecated) |
| topic_chargebacks_wh | https://api.mercadopago.com/v1/chargebacks/[ID] | Get chargeback |
With this information, you will be able to make the necessary updates to your platform, such as updating an approved payment.
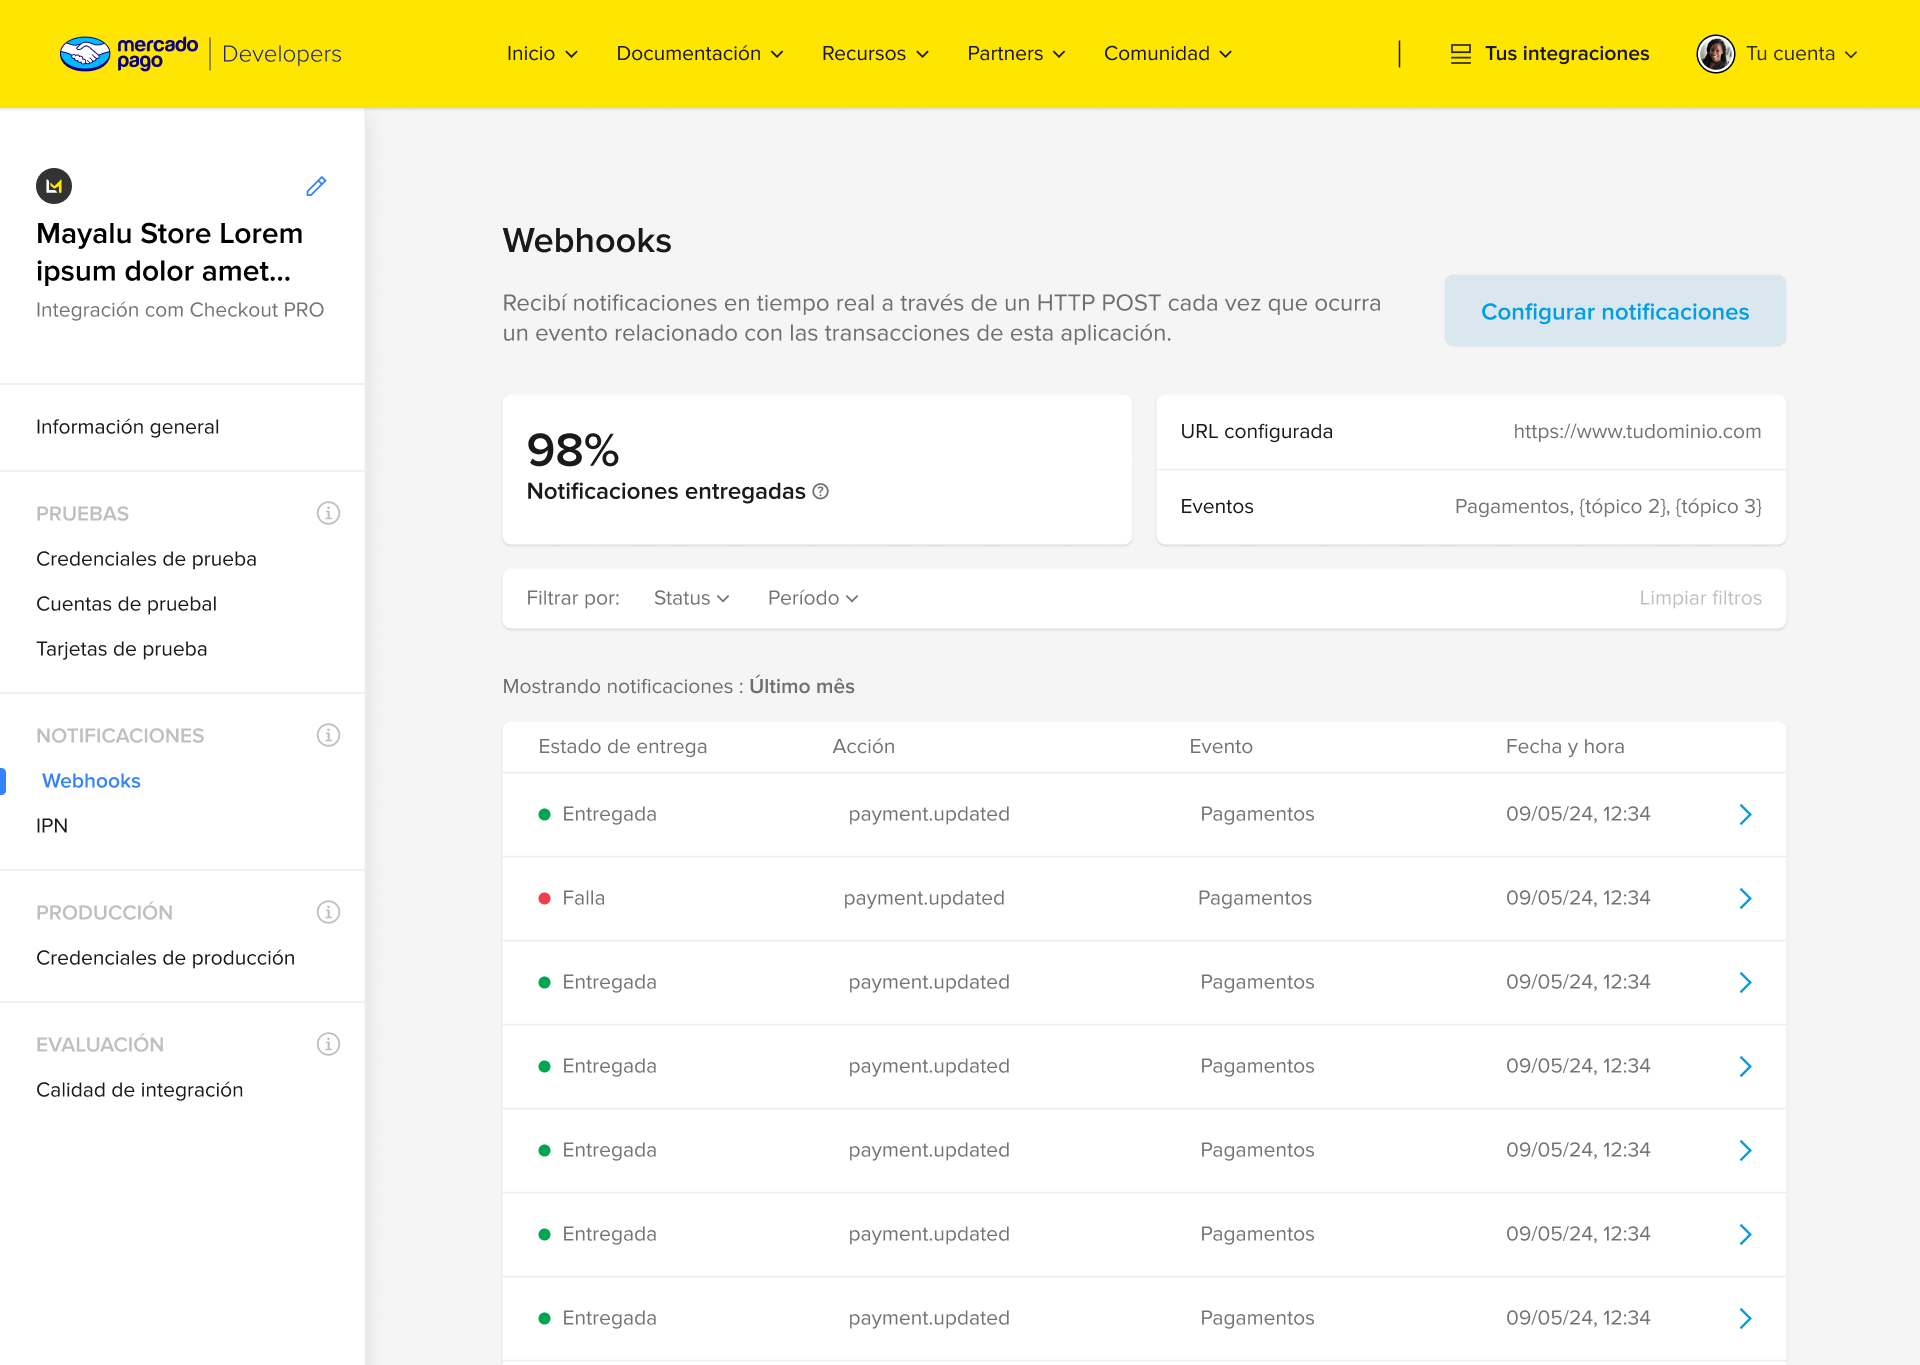
Notifications dashboard
The notification dashboard allows the user to view the events triggered on a specific integration, check the status, and obtain detailed information about these events.
This dashboard will be displayed once you configure your Webhooks notifications, and you can access it anytime by clicking on Webhooks within the Your integrations.
Among the available information, you will find the percentage of notifications delivered, as well as a quick view of which URLs and events are configured.
Additionally, you will find a complete list of the latest notifications sent and their details, such as delivery status (success or failure), action (action associated with the triggered event), event (type of triggered event), and date and time. If desired, you can filter these displayed results by delivery status and by period (date and time).
Evet details
When you click on one of the listed notifications, you can access the event details. This section provides additional information, allowing you to retrieve lost data in case of notification delivery failure, thereby keeping your system up to date.
- Status: Event status along with the corresponding success or error code.
- Event: Type of event triggered as selected in the notification configuration.
- Type: Topic to which the triggered event belongs as selected during configuration.
- Trigger date and time: Date and time when the event was triggered.
- Description: Detailed description of the event as documented.
- Trigger ID: Unique identifier of the sent notification.
- Request: JSON of the request corresponding to the triggered notification.
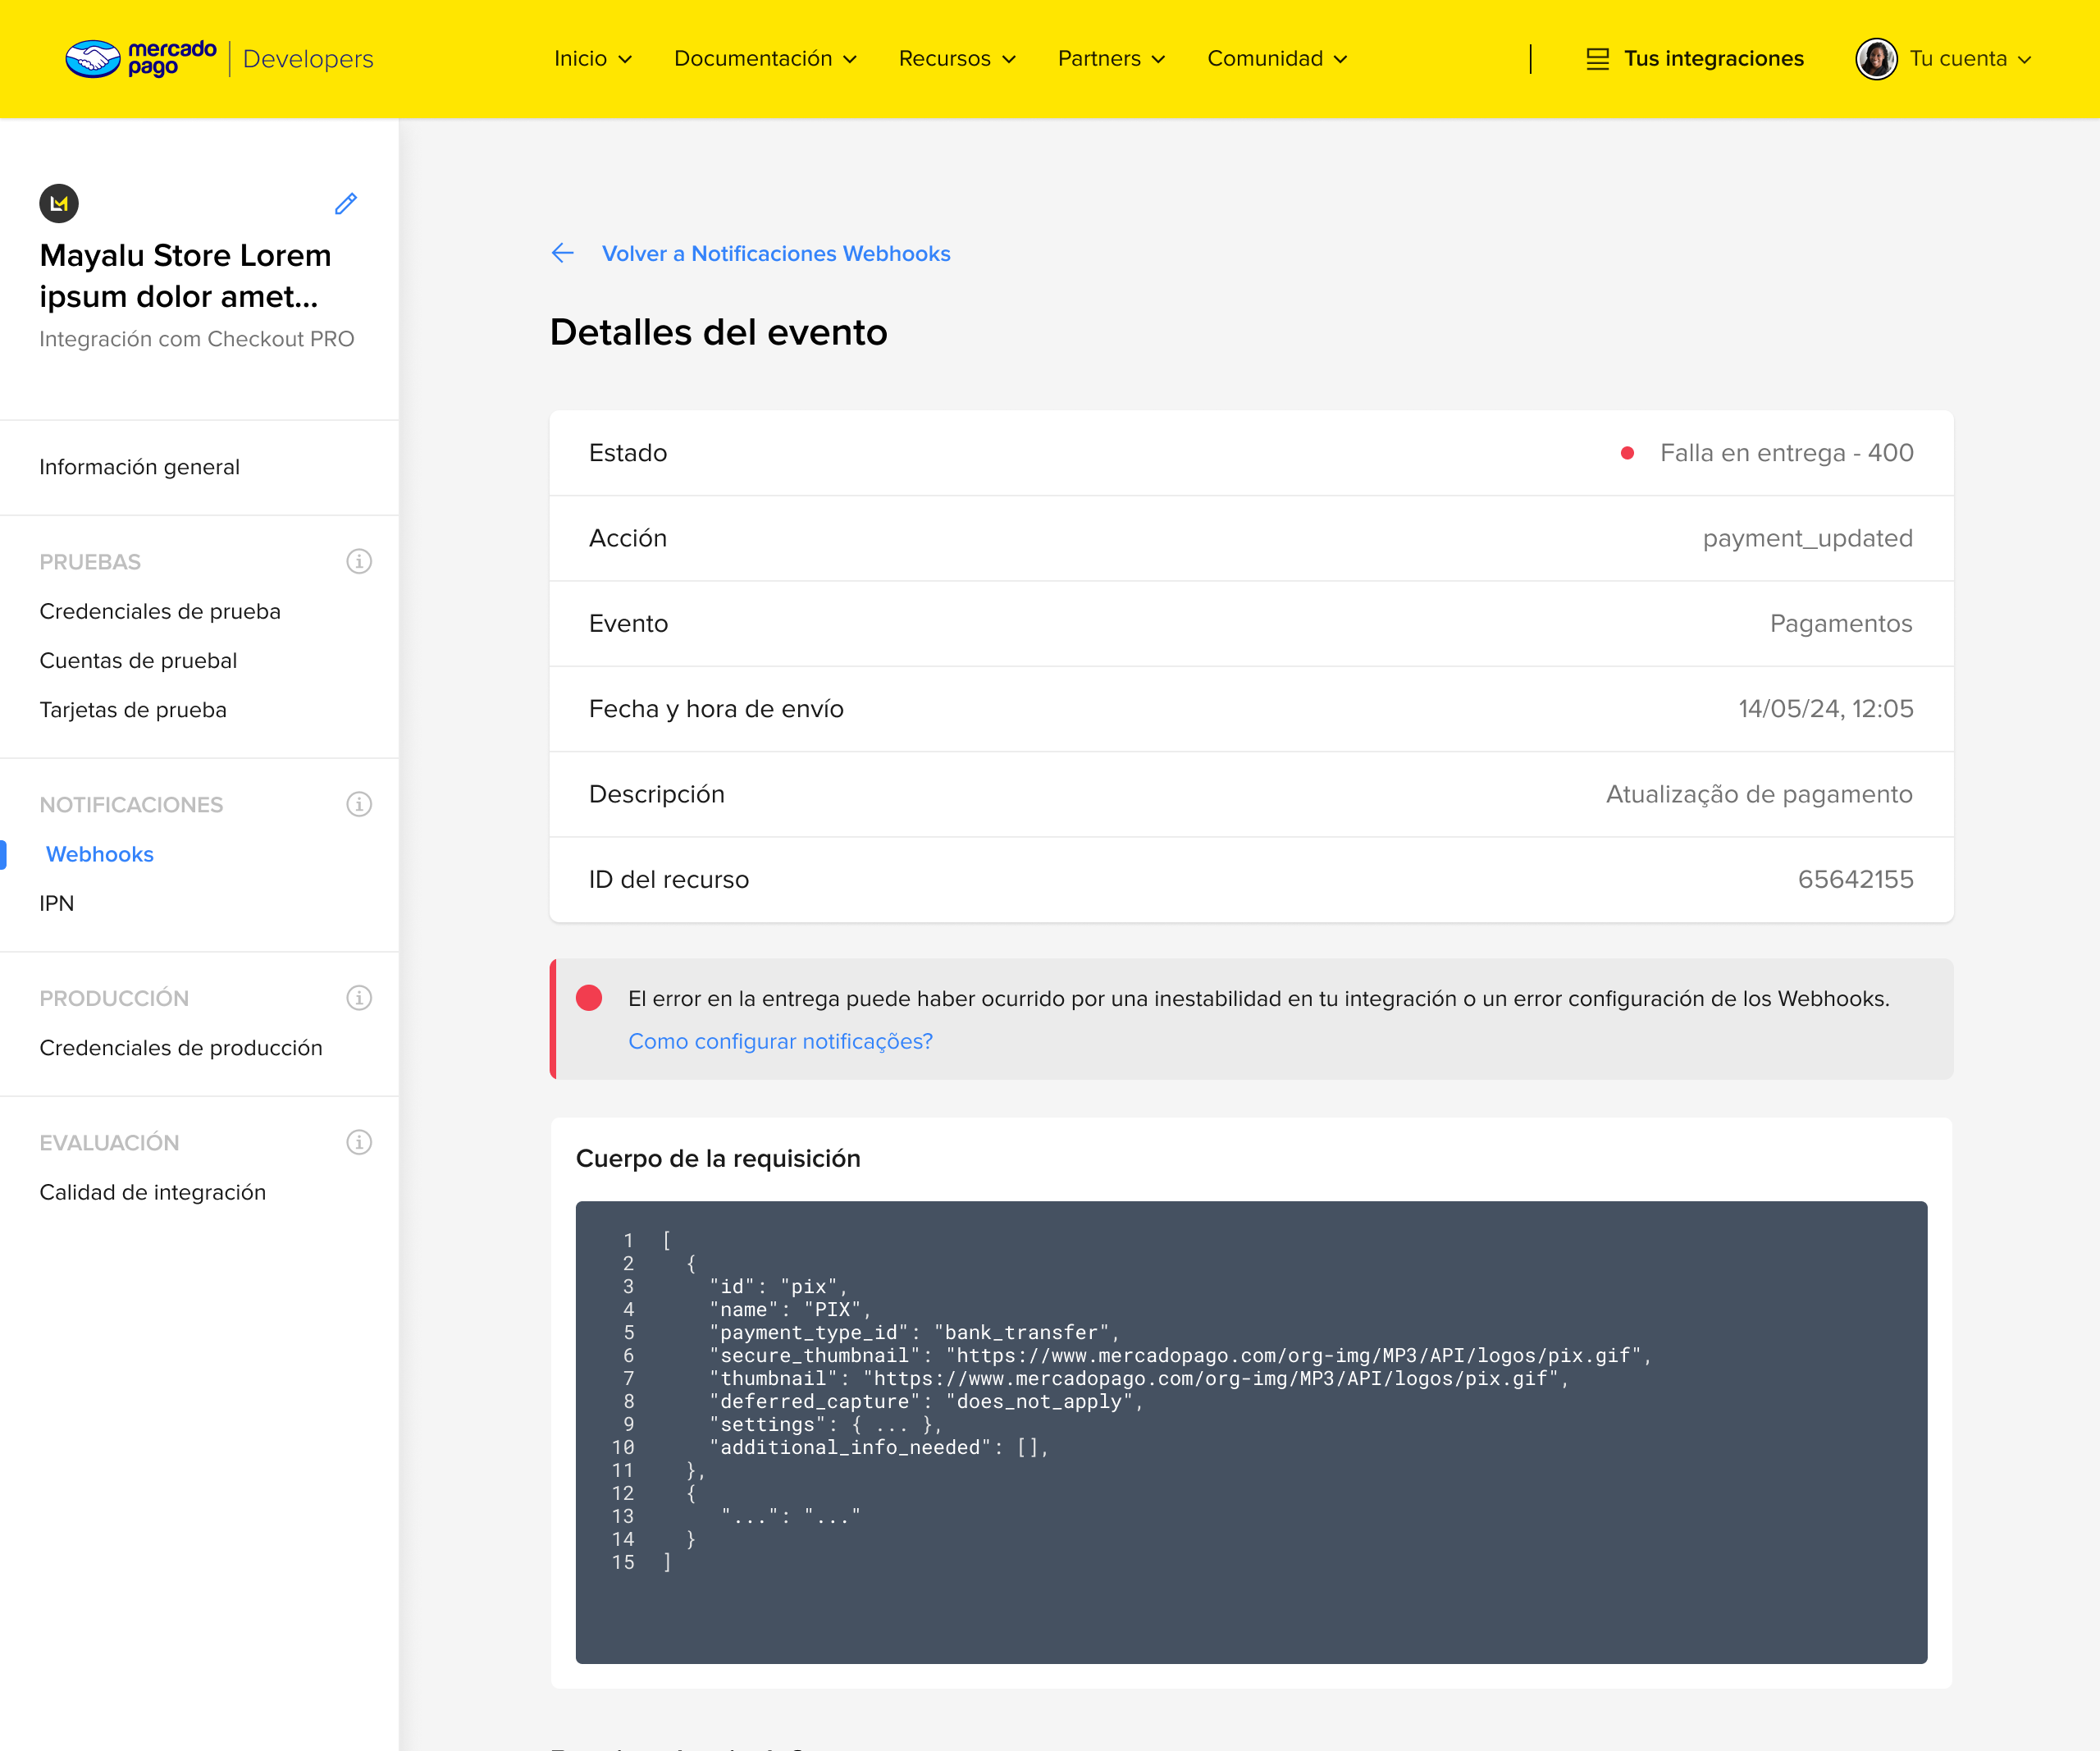
In case of notification delivery failure, you can view the reasons and correct the necessary information to prevent future issues.