
Tokenize payment method
After configuring your development environment, to integrate Automatic Payments you need to securely capture the payer's data and tokenize the card that will be used for charges without CVV.
To do this, you must add a payment form in the frontend using one of these options: the Card Payment Brick, where the Brick is responsible for retrieving the information needed to process the payment, or Core Methods, where you can define how this information will be retrieved. Core Methods is available for websites and mobile applications for Android and iOS.
All of these methods are useful for integrations with first payment, where an initial charge is made using the card's CVV and then tokenized, as well as for registrations and tokenization of cards that will be used for future charges. Choose the one that best suits your needs and follow the corresponding steps.
In the integration through the Card Payment Brick for websites, the MercadoPago.js library, included in your project during the configuration of the development environment, is responsible for obtaining the information required for processing a payment. This means it searches for the types of documents available for the corresponding country, and as the card data is entered, it also retrieves information related to the issuer and the available installments.
All information involved in processing the transaction is stored in the backend, in compliance with PCI security standards.
In addition, the component provides the ability to guide the user with alerts for incomplete fields or possible errors when filling out the data, optimizing the purchasing process.
With this, the implementation of the flow is transparent for those who are performing the integration, as shown in the diagram below.
  sequenceDiagram
    participant Buyer's Browser
    participant Integrator Front-end
    participant MercadoPago.js
    participant Integrator Back-end
    participant Mercado Pago API

    Buyer's Browser->>Integrator Front-end: 1. The buyer accesses the payment screen.
    Integrator Front-end->>MercadoPago.js: 2. The integrator's front-end downloads and initializes Mercado Pago's JS SDK.
    Integrator Front-end->>Buyer's Browser: 3. The integrator's front-end displays the payment form.
    Buyer's Browser->>Integrator Front-end: 4. The buyer completes the form and submits the payment.
    Integrator Front-end->>MercadoPago.js: 5. The integrator's front-end uses the JS SDK to create a token containing the card data securely.
    Integrator Front-end->>Integrator Back-end: 6. The integrator's front-end sends the card token and payment data to its back-end.
    Integrator Back-end->>Mercado Pago API: 7. The back-end calls Mercado Pago services to create the payment.
    Mercado Pago API->>Buyer's Browser: 8. The integrator's front-end shows the buyer the result of the transaction.
    Mercado Pago API->>Integrator Back-end: 9. Mercado Pago may send notifications via Webhook with payment status updates.
    Integrator Back-end->>Buyer's Browser: 10. If applicable, the buyer is notified about the payment update.
To proceed with the configuration, follow the steps below.
Add payment form
To receive payments, you need to add a form in the frontend that allows for securely capturing the payer's information and enables card encryption. This inclusion should be done through the Card Payment Brick, which offers an optimized form with various themes and includes the necessary fields for card payments.
To add the Card Payment Brick, first configure and initialize it from the frontend, as shown in the examples below.
const renderCardPaymentBrick = async (bricksBuilder) => {
  const settings = {
    initialization: {
      amount: 100.99, // total amount to be paid
    },
    callbacks: {
      onReady: () => {
        /*
         Callback called when Brick is ready.
         Here you can hide loadings from your site, for example.
       */
      },
      onSubmit: (formData, additionalData) => {
        // callback called when clicking on the submit data button
        return new Promise((resolve, reject) => {
          const submitData = {
            type: "online",
            total_amount: String(formData.transaction_amount), // should be a string in the format  00.00
            external_reference: "ext_ref_1234", // identifier of the transaction source
            processing_mode: "automatic",
            transactions: {
              payments: [
                {
                  amount: String(formData.transaction_amount), // should be a string in the format  00.00
                  payment_method: {
                    id: formData.payment_method_id,
                    type: additionalData.paymentTypeId,
                    token: formData.token,
                    installments: formData.installments,
                  },
                },
              ],
            },
            payer: {
              email: formData.payer.email,
              identification: formData.payer.identification,
            },
          };

          fetch("/process_order", {
            method: "POST",
            headers: {
              "Content-Type": "application/json",
            },
            body: JSON.stringify(submitData),
          })
            .then((response) => response.json())
            .then((response) => {
              // receive payment result
              resolve();
            })
            .catch((error) => {
              // handle error response when trying to create payment
              reject();
            });
        });
      },
      onError: (error) => {
        // callback called for all Brick error cases
        console.error(error);
      },
    },
  };
  window.cardPaymentBrickController = await bricksBuilder.create(
    "cardPayment",
    "cardPaymentBrick_container",
    settings
  );
};
renderCardPaymentBrick(bricksBuilder);The onSubmit callback of the Brick will obtain the minimum necessary data for creating a payment. Among those minimal data, there is the CardToken, that safely represents the card data. This token can only be used once, and will expire within 7 days.
In addition to the minimum data, we recommend collecting additional details or those that can facilitate the recognition of the purchase by the buyer, thus increasing the payment approval rate. Consult our API Reference for detailed information on all the parameters to be sent when creating a payment, including those that could improve your approval rate, and check which ones you want to include at this stage.
Then, add the relevant fields to the object being sent, which are returned in the callback response.
Finally, render the Brick using one of the examples below.
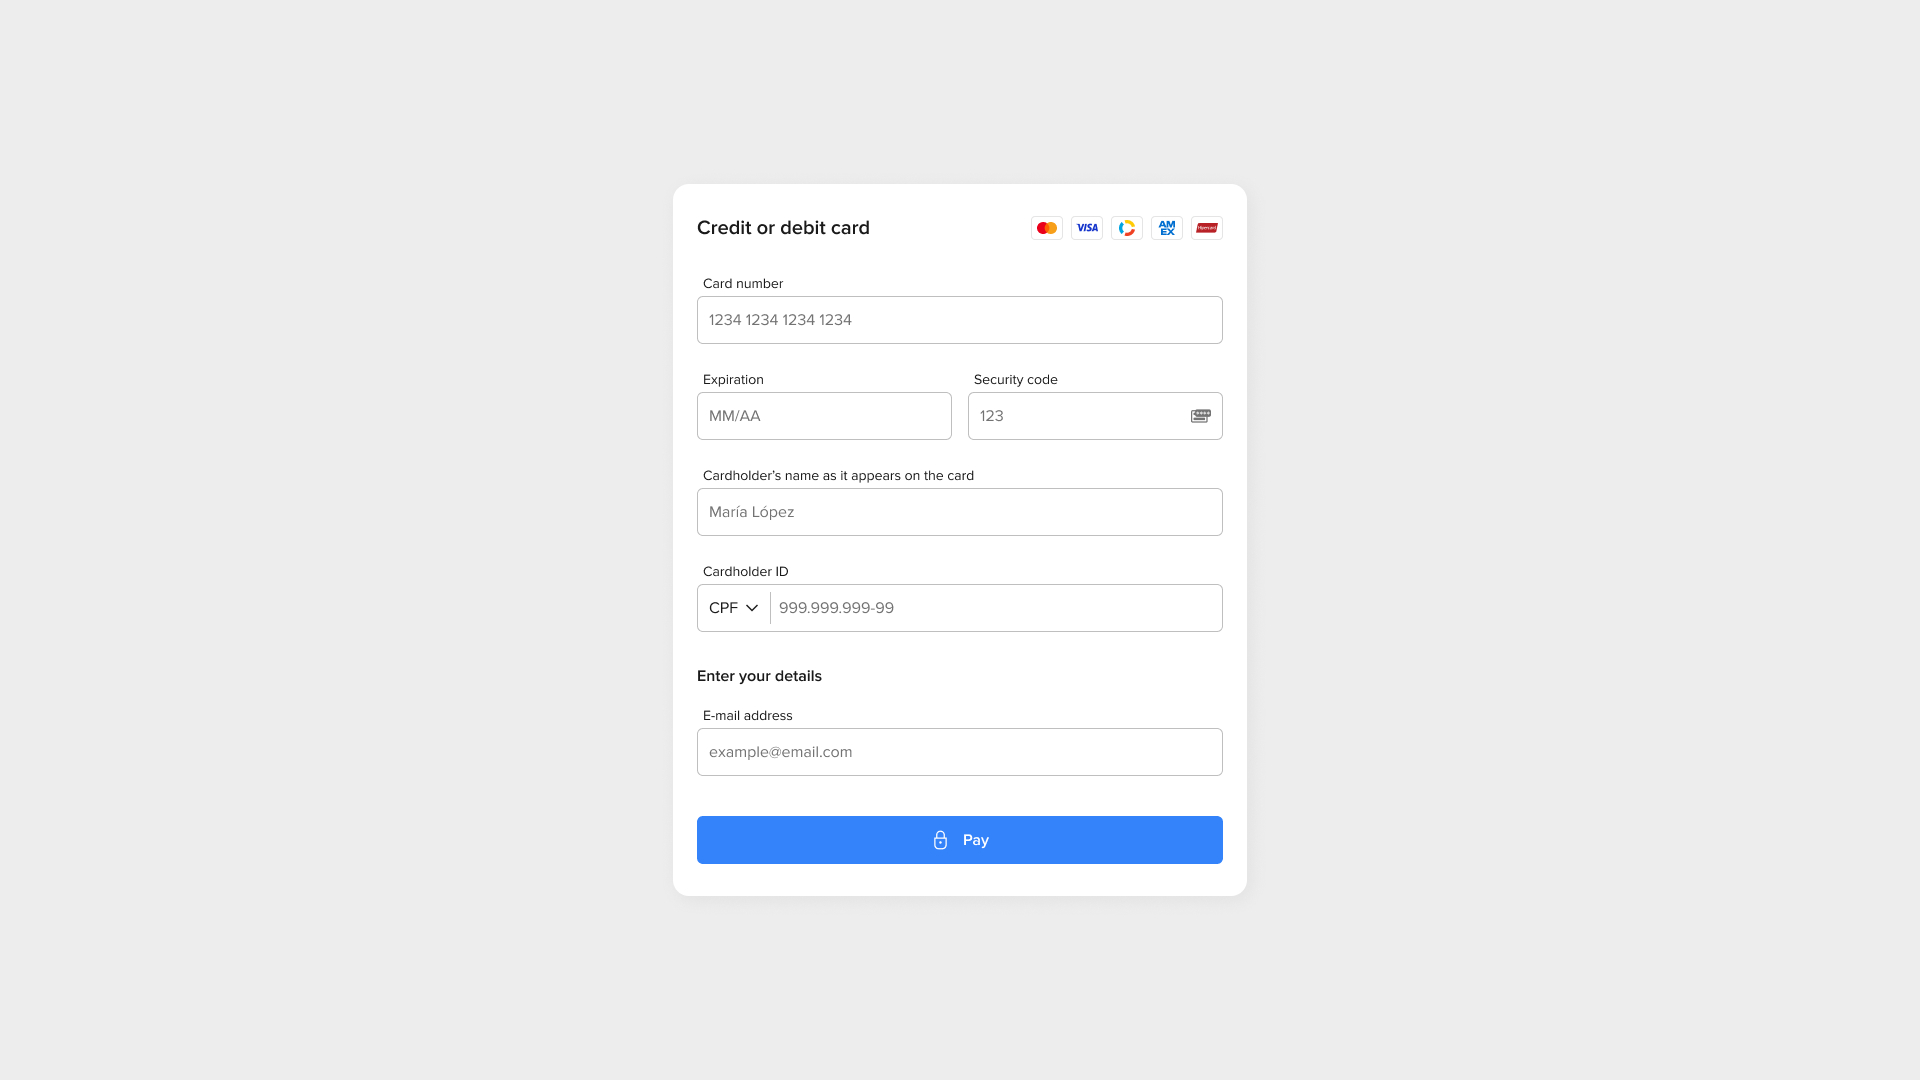
<div id="cardPaymentBrick_container"></div> // The ID must match the value sent in the create() method in the previous stepAs a result, the rendering of the Brick will look similar to the image below.
Finally, your backend must be able to receive the information from the created form, along with the token resulting from the card encryption. For this, we recommend providing an endpoint /Process_order that accommodates the data collected by the Brick after performing the submit action.
To proceed with your integration, you must consider two possible flows: one in which the card is registered from a first regular payment with CVV, and another in which the card registration is done for future payments. Choose the one that best suits your needs and proceed to the corresponding documentation.